
Feast + MLflow + Kubeflow: A Unified AI/ML Lifecycle
Overview
Building production-ready machine learning systems requires more than a great model. It demands a clear separation of concerns between feature management, experiment tracking, and workflow orchestration. This post explores how Feast, MLflow, and Kubeflow work together as complementary open-source tools to cover the full AI/ML lifecycle — from raw data to serving predictions at scale.
These tools are not competitors. Each one occupies a distinct role:
- Feast manages feature data: defining, transforming, storing, and serving features consistently for both training and inference. It also tracks feature lineage and supports data quality monitoring.
- MLflow tracks experiments: logging runs, metrics, parameters, artifacts, and candidate models.
- Kubeflow orchestrates ML workflows: running distributed training, hyperparameter sweeps, and end-to-end pipelines on Kubernetes.
Together they form a complete, open-source foundation for operationalizing ML.
How are Feast, MLflow, and Kubeflow different?
If you are new to these tools, it is natural to wonder whether they overlap. The short answer is: they solve fundamentally different problems in the ML lifecycle. The table below makes this concrete.
| Capability | Feast | MLflow | Kubeflow |
|---|---|---|---|
| Define and version feature schemas | Yes | No | No |
| Store and serve features (online + offline) | Yes | No | No |
| Point-in-time-correct feature retrieval | Yes | No | No |
| Feature transformations (training = serving) | Yes | No | No |
| Feature lineage and registry | Yes | No | No |
| Data quality validation on features | Yes | No | No |
| Log experiments, metrics, and parameters | No | Yes | No |
| Track and compare model versions | No | Yes | No |
| Model registry (promote / alias models) | No | Yes | No |
| Orchestrate multi-step ML pipelines | No | No | Yes (Pipelines) |
| Distributed training on Kubernetes | No | No | Yes (Training Operator) |
| Hyperparameter tuning | No | Yes (with Optuna, etc.) | Yes (Katib) |
A few common misconceptions:
- “Can’t MLflow track my features?” — MLflow can log feature names as parameters, but it does not define, store, transform, or serve features. It has no concept of an offline store, an online store, or point-in-time joins. Feast fills that gap.
- “Doesn’t Kubeflow handle everything end-to-end?” — Kubeflow orchestrates workflows — it tells your pipeline steps when to run and where. But it does not provide feature storage, experiment tracking, or model versioning. You still need Feast for the data layer and MLflow for the experiment layer.
- “Why do I need Feast if I just read from a database?” — Without Feast, teams typically duplicate feature logic between training scripts and serving endpoints, which leads to training–serving skew. Feast guarantees the same transformation and retrieval logic is used in both contexts.
With that context, the rest of this post walks through each tool in detail and shows how they hand off to one another in practice.
This topic has been explored by the community before — the post “Feast with AI: Feed Your MLflow Models with Feature Store” by @qooba is an excellent early look at combining Feast and MLflow. For a hands-on, end-to-end example of Feast and Kubeflow working together, see “From Raw Data to Model Serving: A Blueprint for the AI/ML Lifecycle with Kubeflow and Feast” by Helber Belmiro. This post builds on that prior work and brings all three tools — Feast, MLflow, and Kubeflow — into a single narrative.
The AI/ML Lifecycle
A typical production ML project passes through several stages:
- Feature development — raw data is transformed into meaningful signals.
- Model development — data scientists experiment with algorithms, features, and hyperparameters.
- Model evaluation & selection — the best experiment is chosen for promotion.
- Production deployment — the selected model is deployed and features are served in real time.
- Monitoring & iteration — model and feature health is observed; the cycle repeats.
The diagram below maps each stage to its primary tool:
Raw Data ──► Feast (Feature Engineering & Storage)
                │
                ▼
         MLflow + Kubeflow Pipelines (Experiment Tracking & Orchestration)
                │
                ▼
         Kubeflow Training Operator (Distributed Training)
                │
                ▼
         MLflow Model Registry (Candidate Models)
                │
                ▼
         Feast Online Store + Feature Server (Production Serving)
Feast: Feature Development, Iteration, and Serving
Feast is the data layer of the ML stack. Its core job is to make the same feature logic available both at training time (via the offline store) and at inference time (via the online store), eliminating training–serving skew. Beyond storage and serving, Feast also handles feature transformations, feature lineage tracking, and data quality monitoring — capabilities that are essential when moving features from experimentation to production.
Defining features
A Feast FeatureView declares how a feature is computed and where it is stored:
from datetime import timedelta
from feast import FeatureView, Field, FileSource
from feast.types import Float64, Int64

driver_stats = FeatureView(
    name="driver_hourly_stats",
    entities=["driver_id"],
    ttl=timedelta(days=7),
    schema=[
        Field(name="conv_rate", dtype=Float64),
        Field(name="acc_rate", dtype=Float64),
        Field(name="avg_daily_trips", dtype=Int64),
    ],
    source=FileSource(path="data/driver_stats.parquet", timestamp_field="event_timestamp"),
)
After running feast apply, these features are registered in the Feast registry and visible in the Feast UI:
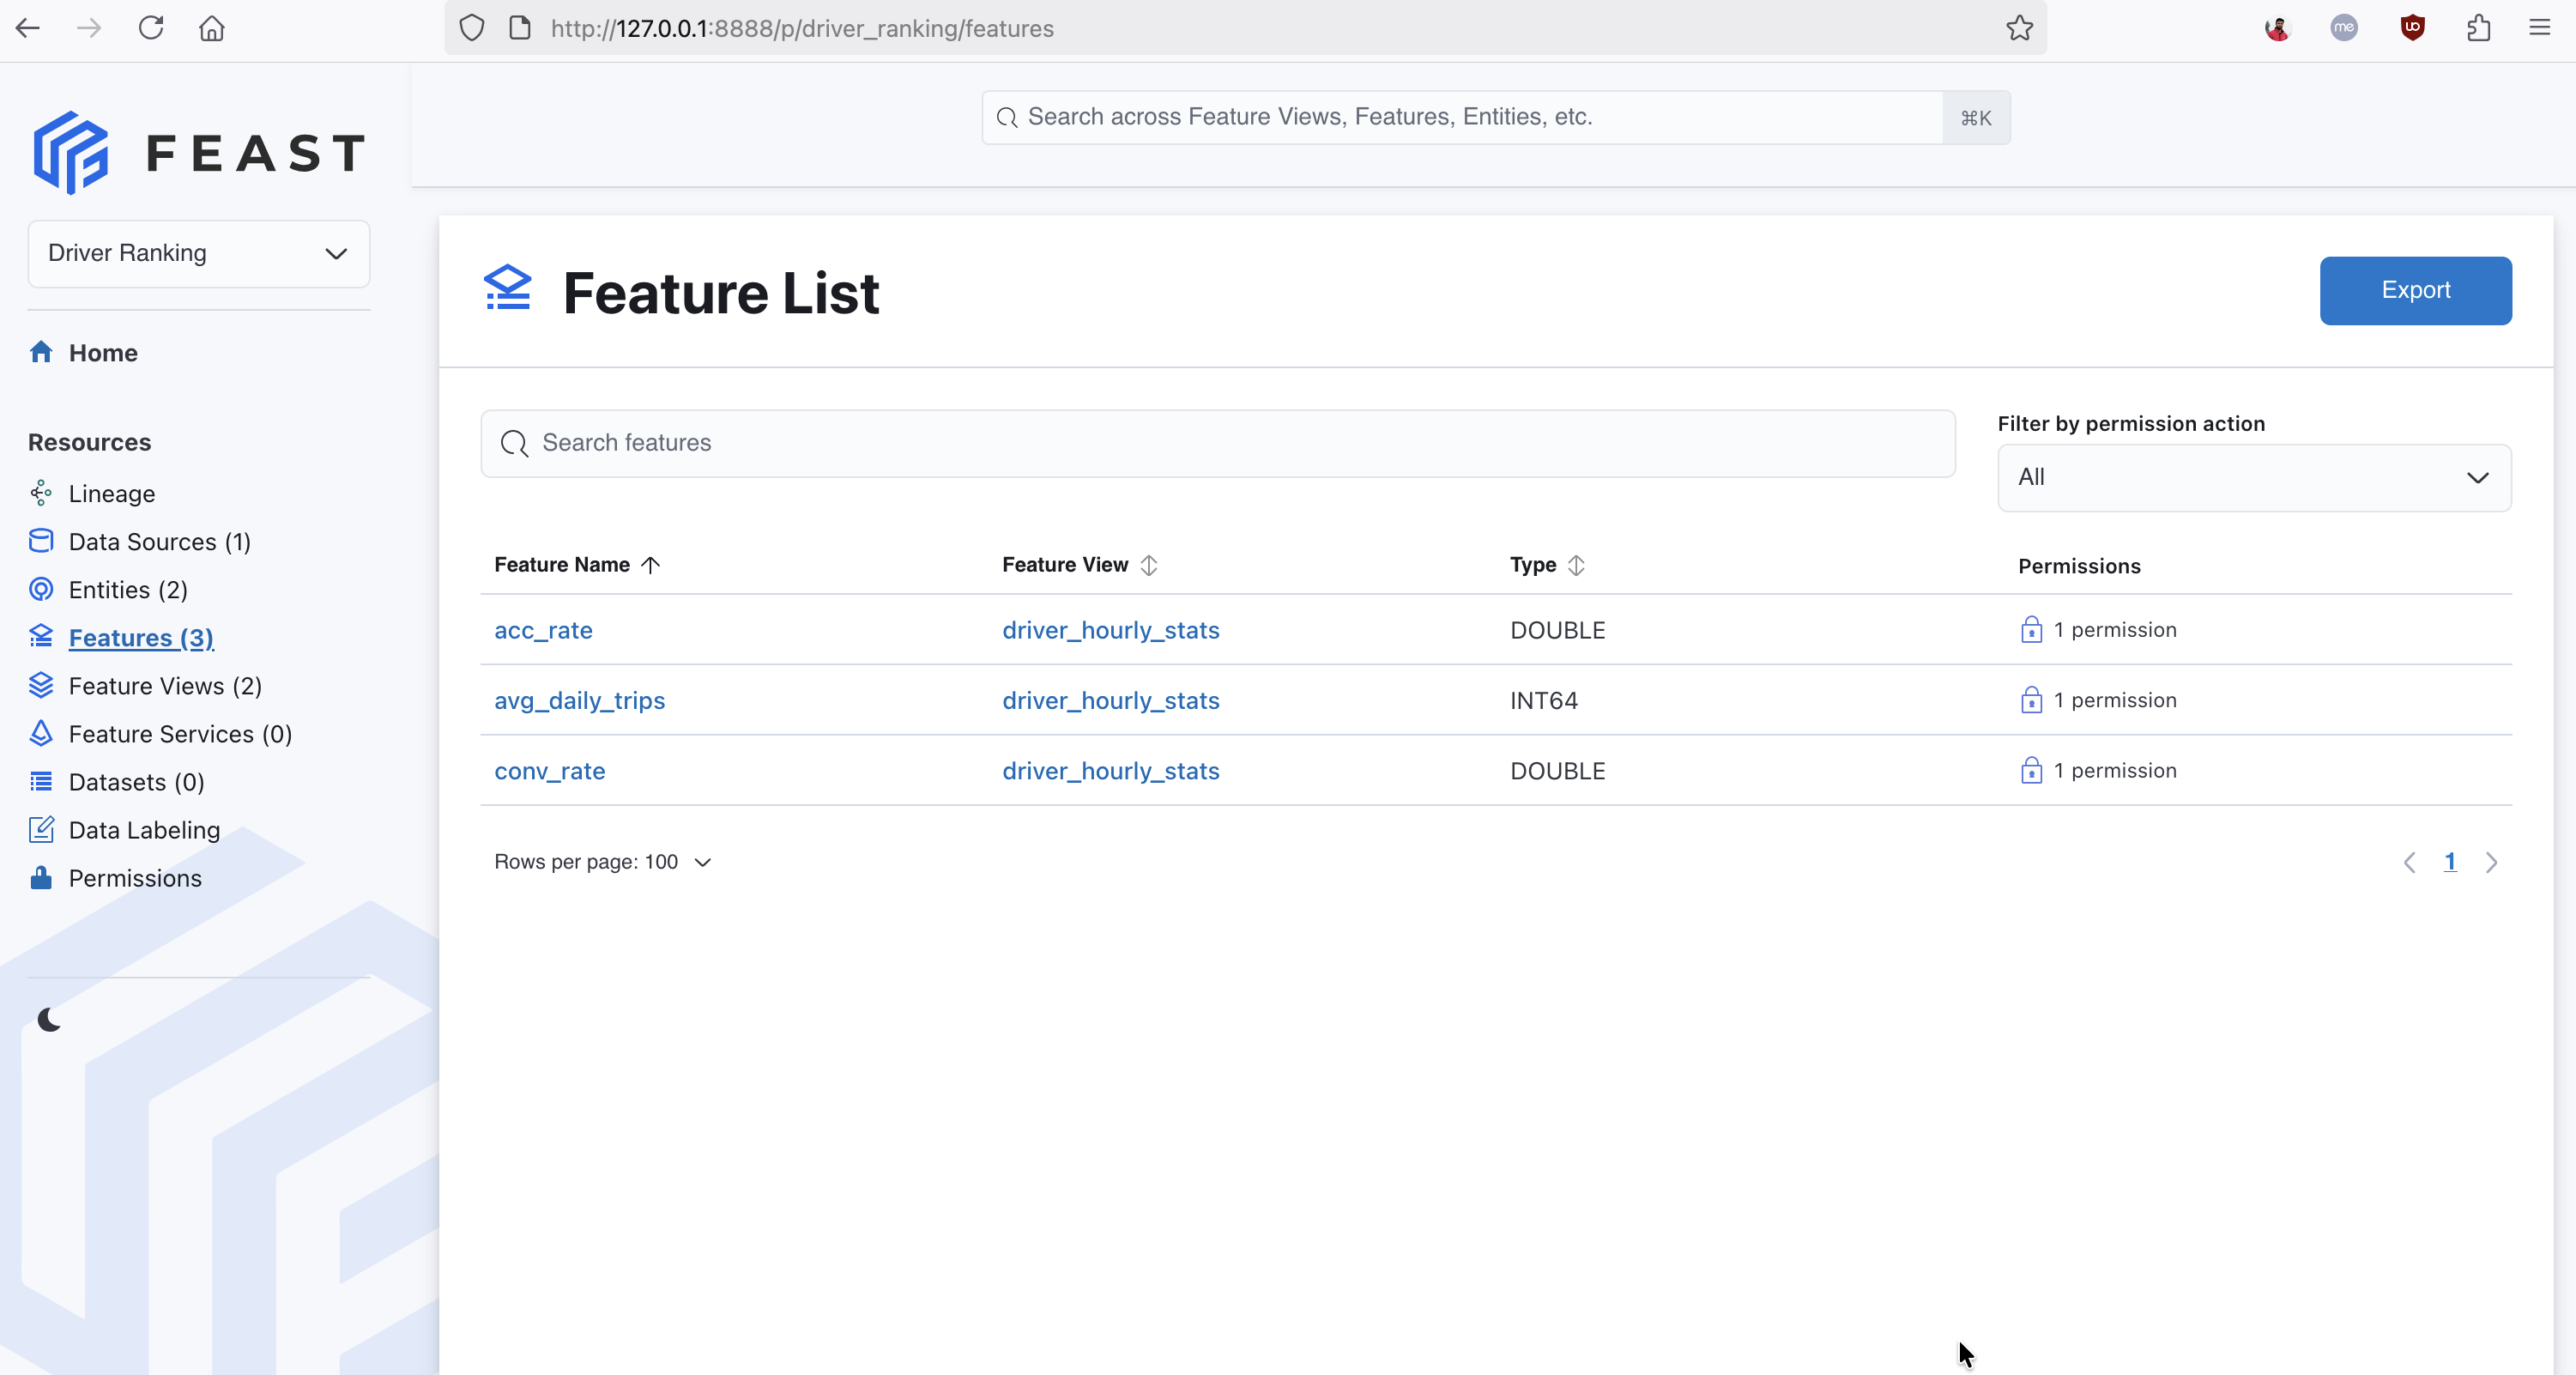
The Feast UI showing three registered features in the driver_hourly_stats feature view — conv_rate, acc_rate, and avg_daily_trips — each linked to the Driver Ranking project.
Retrieving historical features for training
Point-in-time-correct historical features are retrieved from the offline store. This prevents future data from leaking into training examples:
from feast import FeatureStore
import pandas as pd

store = FeatureStore(repo_path=".")

entity_df = pd.DataFrame({
    "driver_id": [1001, 1002, 1003],
    "event_timestamp": pd.to_datetime(["2025-01-01", "2025-01-02", "2025-01-03"]),
})

training_df = store.get_historical_features(
    entity_df=entity_df,
    features=["driver_hourly_stats:conv_rate", "driver_hourly_stats:acc_rate"],
).to_df()
Materializing features for real-time serving
When a model is promoted to production, features are materialized to the online store so they can be retrieved with single-digit millisecond latency:
from datetime import datetime

store.materialize_incremental(end_date=datetime.utcnow())
Serving then becomes a single call:
features = store.get_online_features(
    features=["driver_hourly_stats:conv_rate", "driver_hourly_stats:acc_rate"],
    entity_rows=[{"driver_id": 1001}],
).to_dict()
Feature transformations
Feast supports on-demand feature transformations, allowing you to define transformation logic that runs at retrieval time — both offline (for training) and online (for serving) — using the same Python function. This eliminates the need to duplicate transformation code across training and inference pipelines:
from feast.on_demand_feature_view import on_demand_feature_view
from feast import Field
from feast.types import Float64

@on_demand_feature_view(
    sources=[driver_stats],
    schema=[Field(name="conv_acc_ratio", dtype=Float64)],
)
def driver_ratios(inputs):
    df = inputs.copy()
    df["conv_acc_ratio"] = df["conv_rate"] / (df["acc_rate"] + 1e-6)
    return df[["conv_acc_ratio"]]
Here driver_stats is the FeatureView object defined earlier. The sources parameter accepts FeatureView, RequestSource, or FeatureViewProjection objects.
Using on_demand_feature_view ensures that the same transformation logic is applied whether features are retrieved from the offline store for training or from the online store at inference time, preventing transformation skew.
Feature lineage
The Feast feature registry acts as the single source of truth for feature definitions. Every FeatureView, data source, entity, and transformation is registered and versioned in the registry. This gives you full lineage from raw data source through transformation logic to the feature values consumed by a model — a critical requirement for debugging, auditing, and regulatory compliance.
You can inspect the lineage of any feature programmatically:
from feast import FeatureStore

store = FeatureStore(repo_path=".")
feature_view = store.get_feature_view("driver_hourly_stats")
print(feature_view.source)   # upstream data source
print(feature_view.schema)   # feature schema
For cross-system lineage that extends beyond Feast into upstream data pipelines and downstream model training, Feast also supports native OpenLineage integration. Enabling it in your feature_store.yaml automatically emits lineage events on feast apply and feast materialize, letting you visualize the full data flow in tools like Marquez.
Data quality monitoring
:::note The Great Expectations integration described in earlier versions of this post is now deprecated. Feast includes a built-in Feature Quality Monitoring system that provides richer metrics, requires no external dependencies, and includes a monitoring UI. :::
Feast’s native data quality monitoring system automatically computes statistical metrics — null rates, distributions, percentiles, histograms — for every registered feature across both batch data and serving logs. It detects drift by comparing current metrics against baselines computed during feast apply.
# feature_store.yaml
data_quality_monitoring:
  auto_baseline: true
# Compute metrics across all granularities (daily, weekly, monthly, quarterly)
feast monitor run
# Monitor serving logs
feast monitor run --source-type logThe monitoring UI dashboard (accessible from the sidebar) provides per-feature health status, distribution histograms, time-series drift charts, and configurable filters. Metrics are also available via REST API endpoints for integration with external alerting systems.
For details, see the Feature Quality Monitoring guide.
Feast Feature Registry vs. MLflow Model Registry
A common question is how the Feast feature registry relates to the MLflow model registry. They are different things that serve complementary roles.
| Feast Feature Registry | MLflow Model Registry | |
|---|---|---|
| What it tracks | Feature definitions, schemas, data sources, entity relationships | Model artifacts, versions, model aliases (e.g., “production”, “staging”) |
| Primary users | Feature engineers, data scientists, ML platform teams | Data scientists, ML engineers |
| Relationship to production | Defines what data is available for training and serving | Tracks which model version is promoted to production |
| Scope | All features ever defined — a superset of what any one model uses | All model versions, including candidates that never ship |
This distinction is important: the Feast registry is a superset of the MLflow model registry from a feature perspective. During experimentation, a data scientist may train models using dozens of features. Once a model is selected for production, only a subset of those features will be needed for online serving. Feast’s registry records all available features; the specific features required by the production model are a narrower slice that corresponds to what MLflow logged as model inputs.
MLflow: Experiment Tracking, Hyperparameter Optimization, and Feature Selection
MLflow is the experimentation layer. It answers the question: “Which combination of features, model architecture, and hyperparameters produced the best result?”
Logging a training run with Feast features
Because Feast provides a consistent get_historical_features API, it is straightforward to combine it with MLflow tracking:
import mlflow
import mlflow.sklearn
from feast import FeatureStore
from sklearn.linear_model import LogisticRegression
from sklearn.model_selection import train_test_split
from sklearn.metrics import roc_auc_score
import pandas as pd

store = FeatureStore(repo_path=".")

entity_df = pd.read_parquet("data/driver_labels.parquet")
feature_df = store.get_historical_features(
    entity_df=entity_df,
    features=["driver_hourly_stats:conv_rate", "driver_hourly_stats:acc_rate", "driver_hourly_stats:avg_daily_trips"],
).to_df()

X = feature_df[["conv_rate", "acc_rate", "avg_daily_trips"]]
y = feature_df["label"]
X_train, X_test, y_train, y_test = train_test_split(X, y, test_size=0.2)

with mlflow.start_run():
    mlflow.log_param("features", ["conv_rate", "acc_rate", "avg_daily_trips"])
    mlflow.log_param("model_type", "LogisticRegression")

    model = LogisticRegression()
    model.fit(X_train, y_train)

    auc = roc_auc_score(y_test, model.predict_proba(X_test)[:, 1])
    mlflow.log_metric("auc", auc)

    # Log the feature store snapshot alongside the model
    mlflow.sklearn.log_model(model, artifact_path="model")
    mlflow.log_artifact("feature_store.yaml", artifact_path="feast_config")
Logging feature_store.yaml together with the model artifact ensures that, at any future point, the exact set of Feast feature definitions used for that run can be reproduced.
Feature selection with MLflow
One of the most powerful uses of Feast + MLflow together is systematic feature selection: training models with different subsets of Feast features and using MLflow’s comparison UI to identify which combination produces the best results. This is far more rigorous than manually trying feature sets in a notebook, and the results are often counterintuitive.
The pattern is to loop over candidate feature subsets, retrieve each one from Feast, train a model, and log the metrics and feature names as a separate MLflow run:
import mlflow
import mlflow.sklearn
from feast import FeatureStore
from sklearn.linear_model import LogisticRegression
from sklearn.model_selection import train_test_split
from sklearn.metrics import roc_auc_score
import pandas as pd

store = FeatureStore(repo_path=".")

entity_df = pd.read_parquet("data/driver_labels.parquet")

# Define candidate feature subsets to compare
feature_subsets = {
    "acc_rate_only":         ["driver_hourly_stats:acc_rate"],
    "acc_rate_trips":        ["driver_hourly_stats:acc_rate", "driver_hourly_stats:avg_daily_trips"],
    "all_features":          ["driver_hourly_stats:conv_rate", "driver_hourly_stats:acc_rate",
                              "driver_hourly_stats:avg_daily_trips"],
}

with mlflow.start_run(run_name="feast_feature_selection"):
    for subset_name, feature_refs in feature_subsets.items():
        feature_df = store.get_historical_features(
            entity_df=entity_df,
            features=feature_refs,
        ).to_df()

        feature_cols = [ref.split(":")[1] for ref in feature_refs]
        X = feature_df[feature_cols]
        y = feature_df["label"]
        X_train, X_test, y_train, y_test = train_test_split(X, y, test_size=0.2, random_state=42)

        with mlflow.start_run(run_name=subset_name, nested=True):
            mlflow.log_param("features", feature_cols)
            model = LogisticRegression()
            model.fit(X_train, y_train)
            auc = roc_auc_score(y_test, model.predict_proba(X_test)[:, 1])
            mlflow.log_metric("auc", auc)
            mlflow.sklearn.log_model(model, artifact_path="model")
After running, the MLflow UI lets you sort all nested runs by AUC and immediately see which feature subset wins. The results can be surprising — for example, with synthetic driver data a single feature may outperform the full feature set:
| Features | Model | AUC |
|---|---|---|
acc_rate only | LogisticRegression | 0.645 |
acc_rate + avg_daily_trips | LogisticRegression | 0.613 |
| All 3 features | LogisticRegression | 0.570 |

The MLflow UI showing a LogisticRegression run trained with all three Feast features (conv_rate, acc_rate, avg_daily_trips). The run logs five metrics (accuracy, AUC, precision, recall, F1), the feature list as a parameter, and the demo tags each included feature (e.g., feature_conv_rate: included) for easy filtering.
This is exactly the kind of insight MLflow’s comparison interface is built for. You can sort runs by AUC, filter by which features were included, and visualize performance across experiments. Note that with synthetic data these numbers won’t carry real meaning — the point is that the tooling makes it trivial to observe these differences systematically and let data drive the feature selection decision.
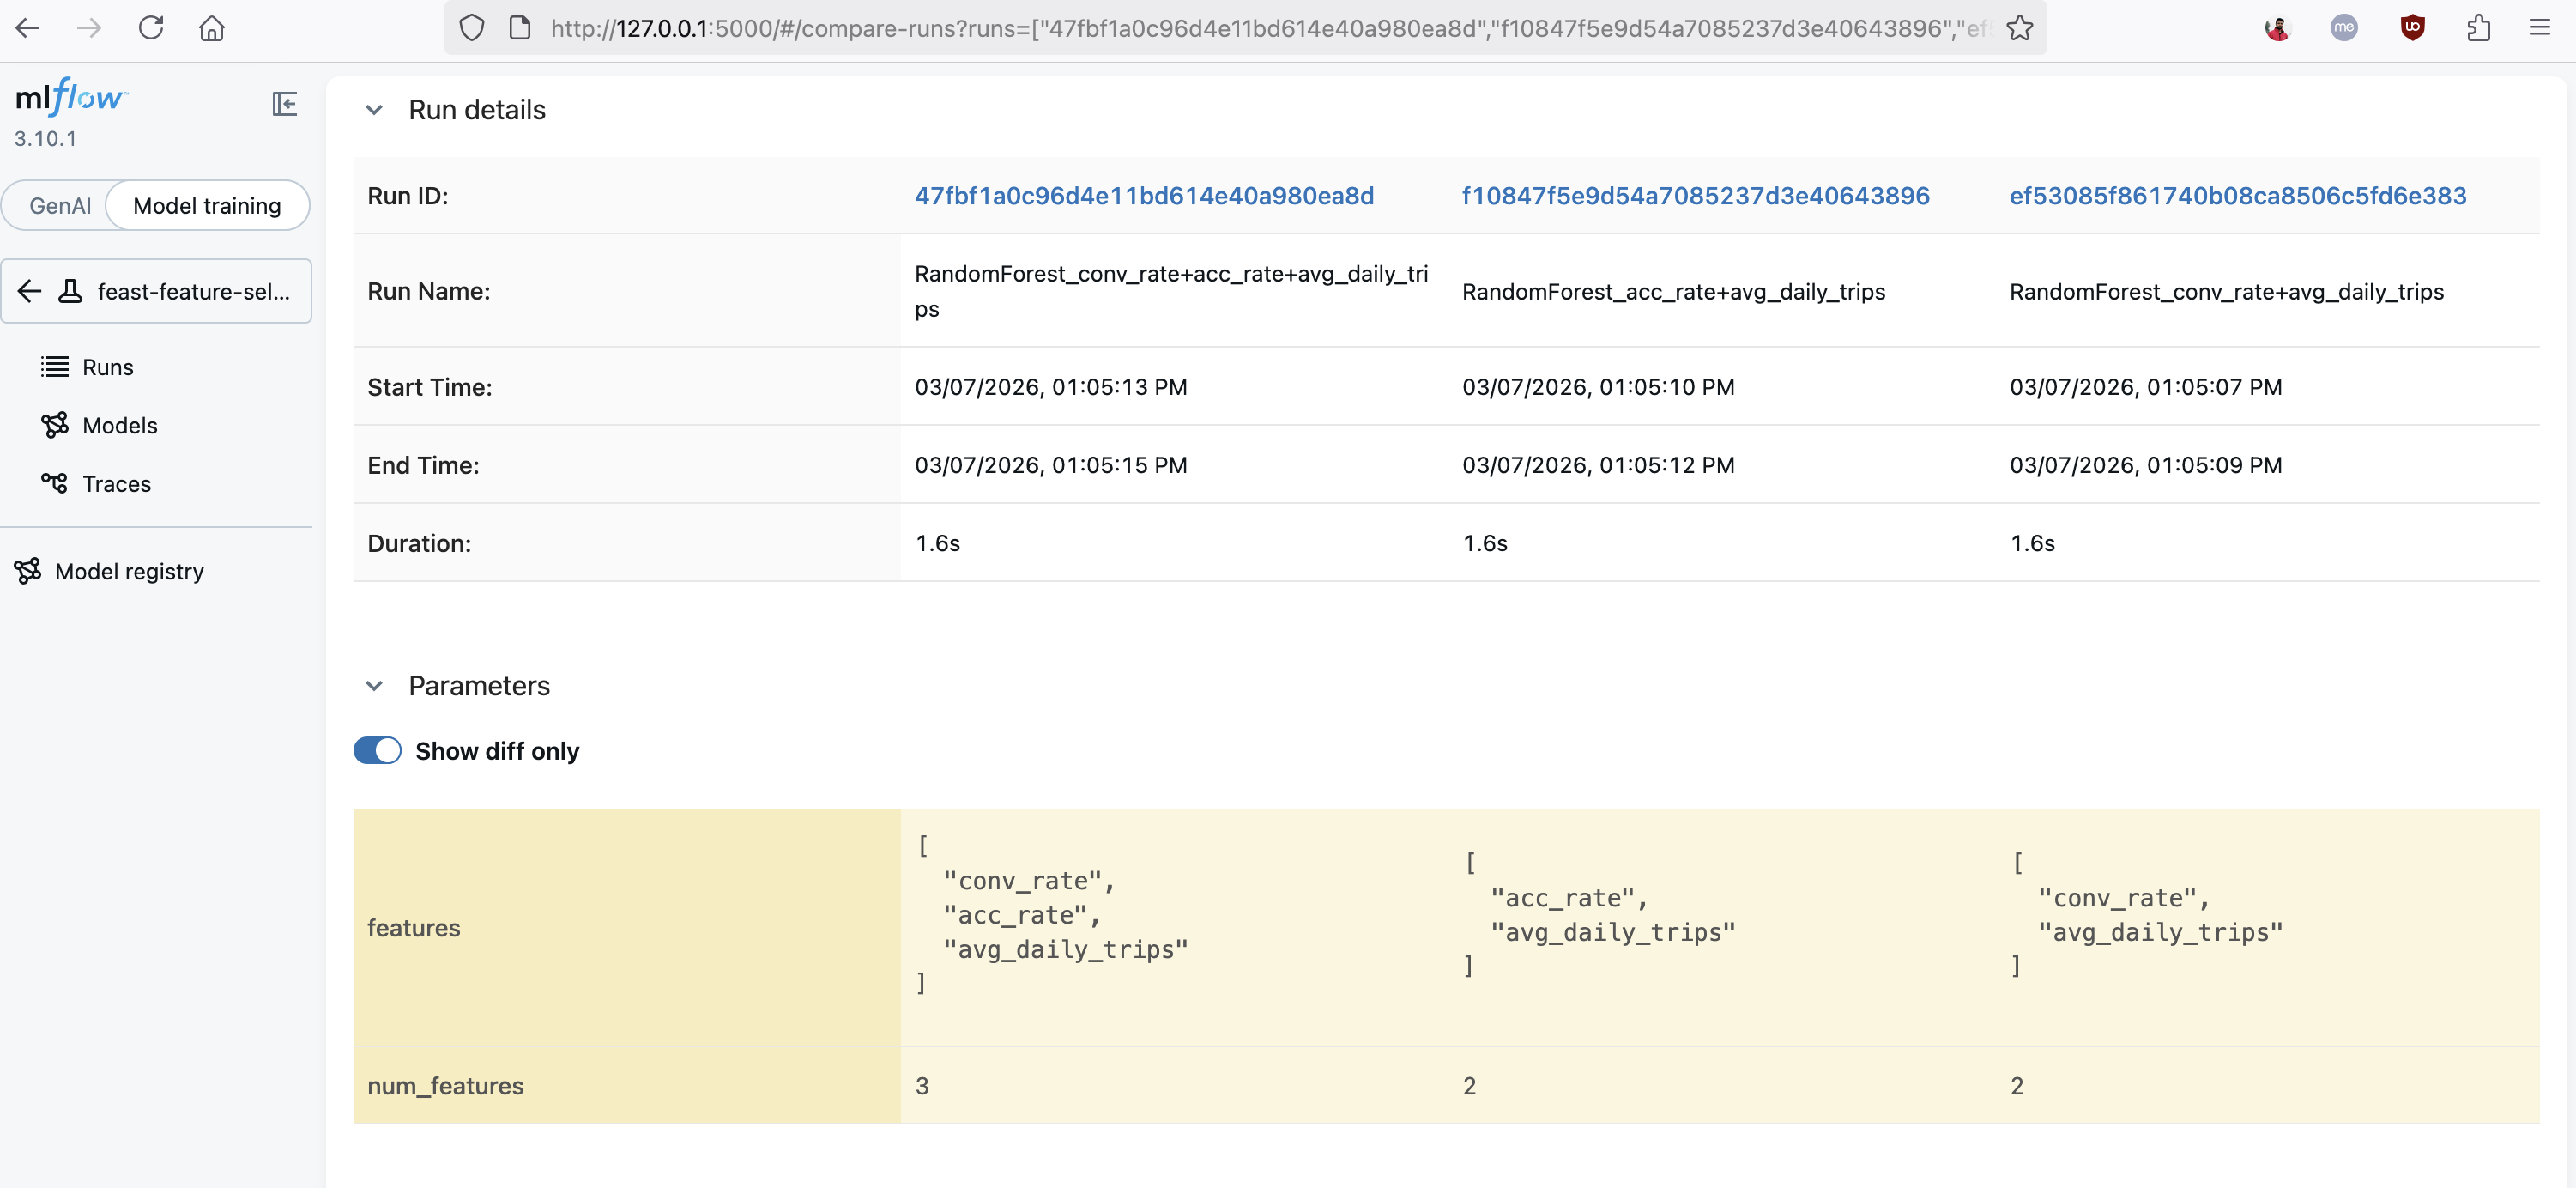
MLflow's comparison view showing three runs side by side with different feature subsets. The "Show diff only" toggle highlights how the features parameter varies across runs, making it easy to identify which combination of Feast features produces the best results.
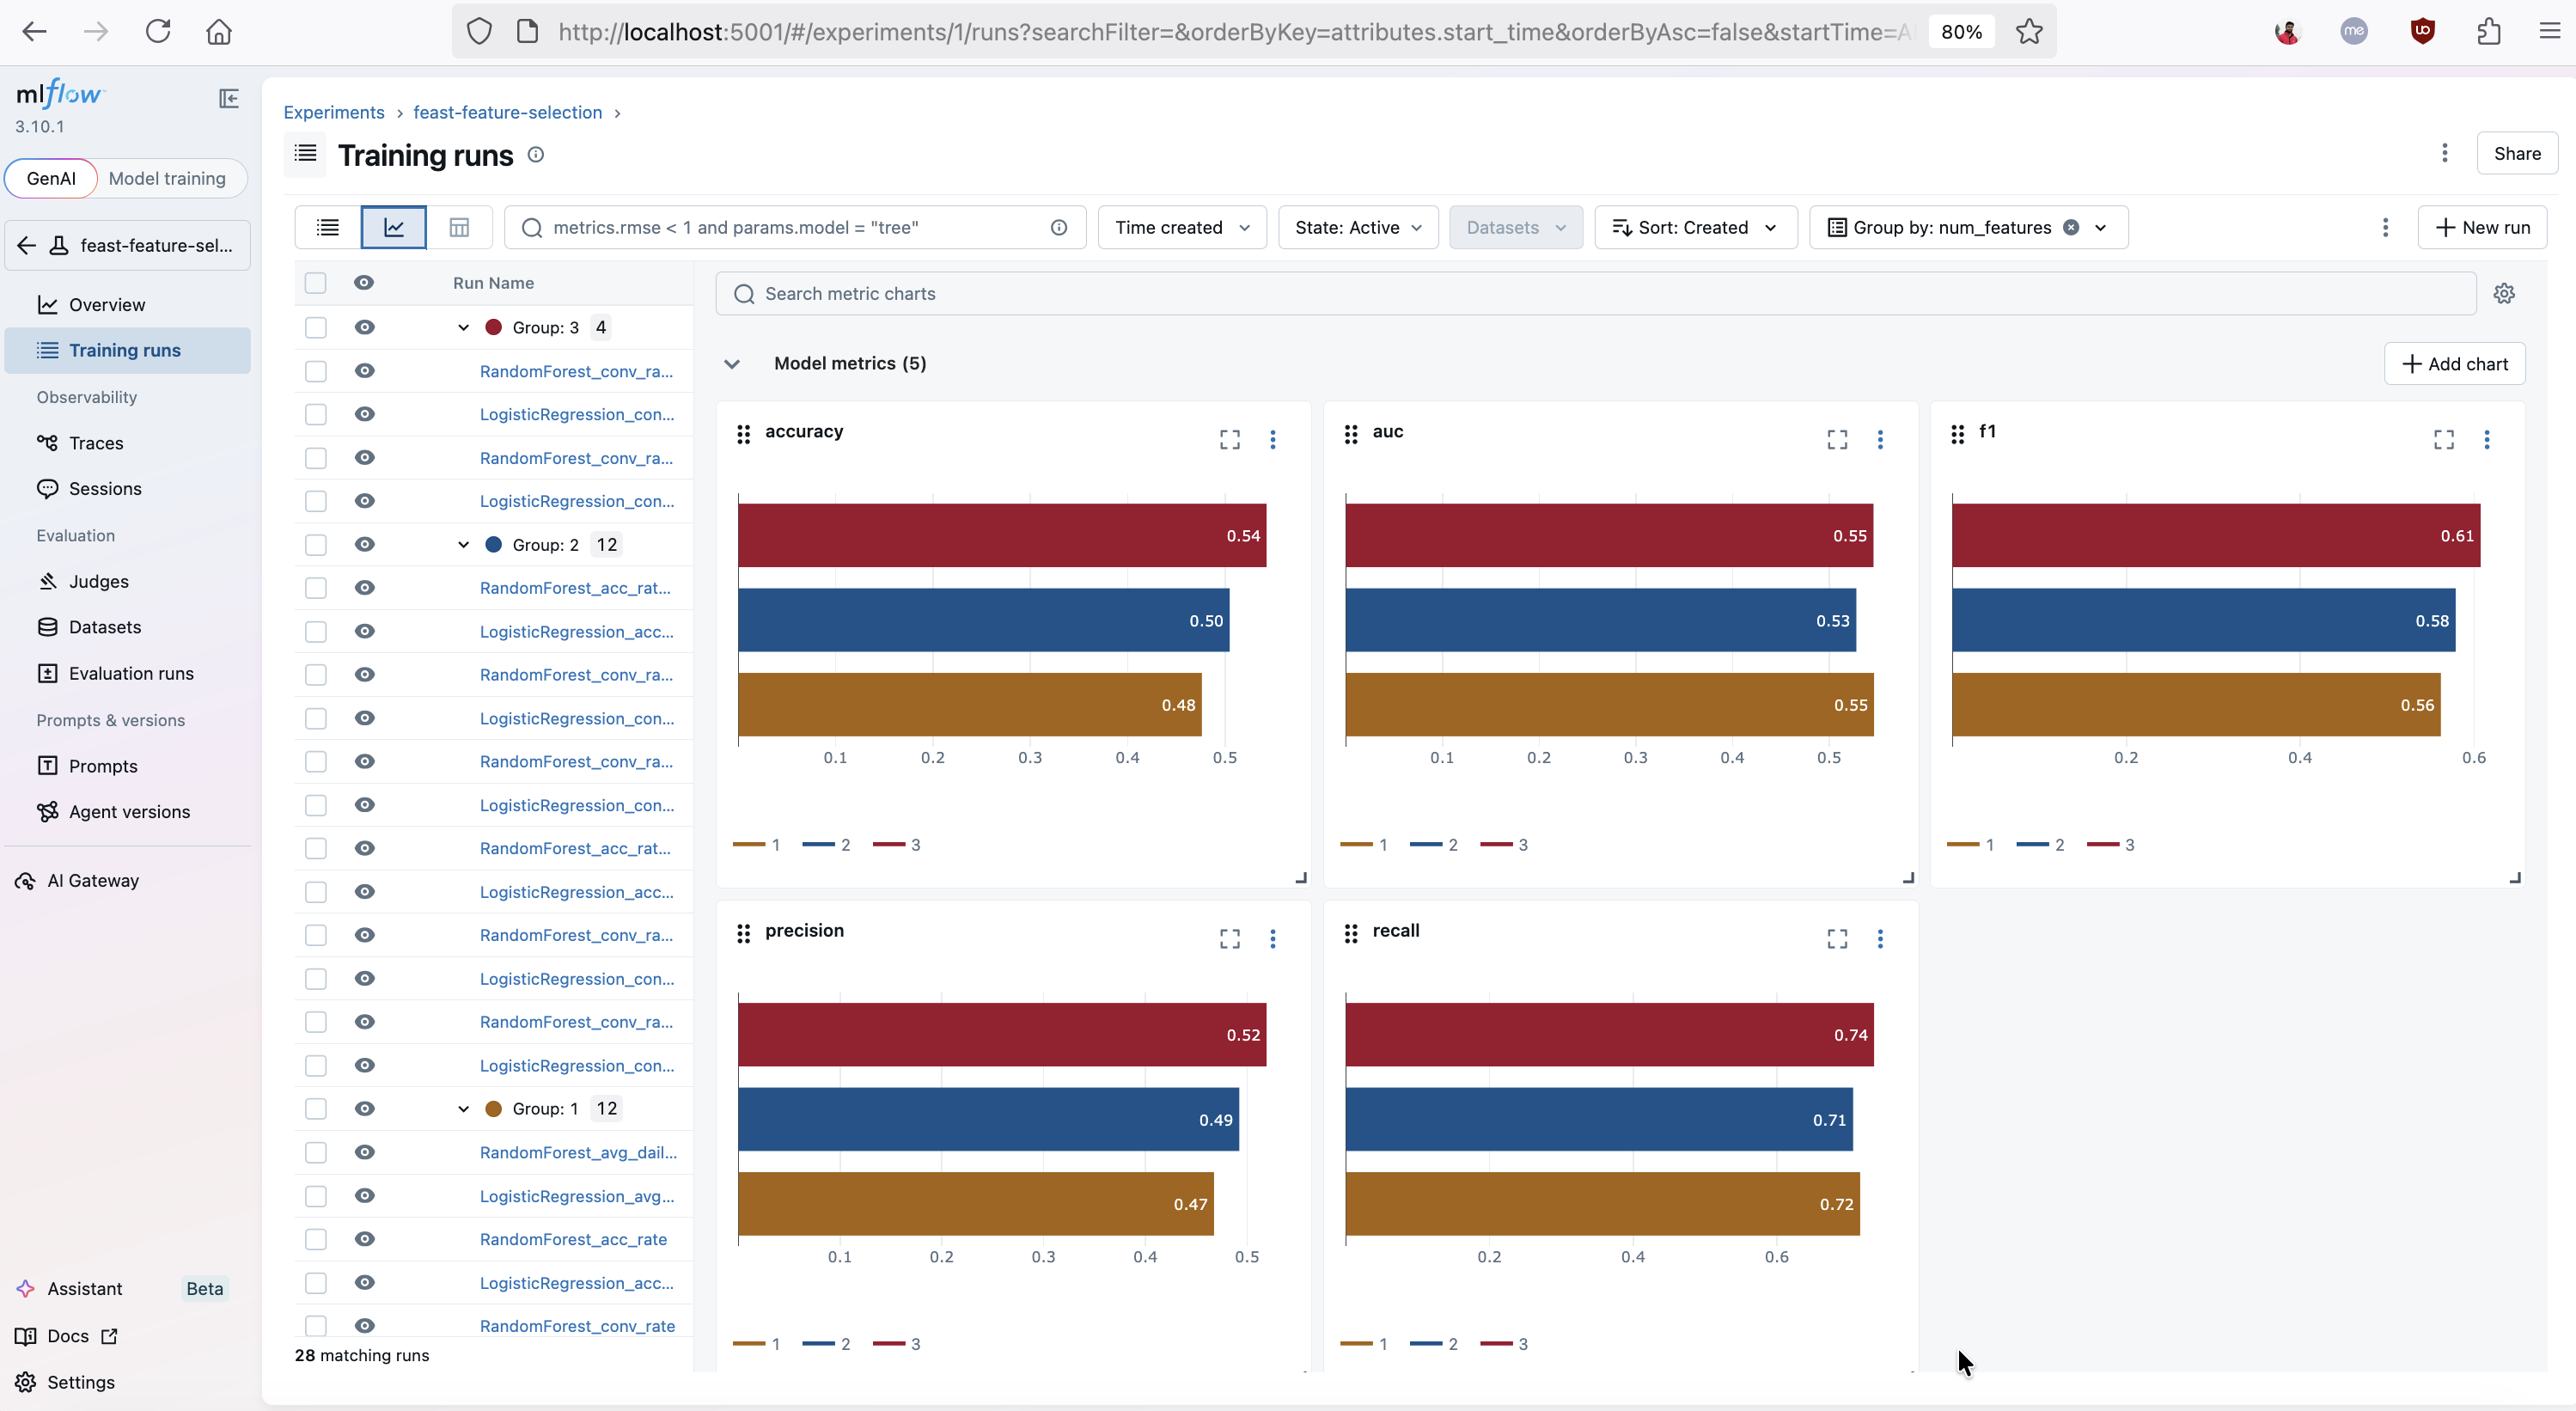
MLflow's metric charts view visualizing accuracy, AUC, F1, precision, and recall across all feature selection runs, grouped by num_features. This chart makes it easy to spot how model performance changes as more Feast features are included.
Once you have identified the winning subset, the Feast registry ensures that only those features need to be materialized into the online store for production serving.
Hyperparameter sweeps
MLflow integrates natively with hyperparameter optimization libraries. For example, using MLflow with Optuna:
import optuna
import mlflow

def objective(trial):
    C = trial.suggest_float("C", 1e-3, 10.0, log=True)
    max_iter = trial.suggest_int("max_iter", 100, 1000)

    with mlflow.start_run(nested=True):
        mlflow.log_params({"C": C, "max_iter": max_iter})
        model = LogisticRegression(C=C, max_iter=max_iter)
        model.fit(X_train, y_train)
        auc = roc_auc_score(y_test, model.predict_proba(X_test)[:, 1])
        mlflow.log_metric("auc", auc)
    return auc

with mlflow.start_run(run_name="optuna_sweep"):
    study = optuna.create_study(direction="maximize")
    study.optimize(objective, n_trials=20)
All trials, their parameters, and their metrics are automatically captured in the MLflow tracking server, making it easy to compare runs and select the best candidate for promotion.
Kubeflow: Orchestrating the ML Workflow
Kubeflow brings Kubernetes-native orchestration to the ML lifecycle. Its two most relevant components here are:
- Kubeflow Pipelines — a platform for building and deploying repeatable ML workflows as DAGs.
- Kubeflow Training Operator — manages distributed training jobs (PyTorchJob, TFJob, etc.) on Kubernetes.
Kubeflow Pipelines integrating Feast and MLflow
Kubeflow Pipelines lets you compose the entire workflow — feature retrieval, training, evaluation, and registration — as a single, reproducible pipeline:
from kfp import dsl

@dsl.component(base_image="python:3.10-slim", packages_to_install=["feast", "mlflow", "scikit-learn", "pandas", "pyarrow"])
def retrieve_features(entity_df_path: str, feature_store_repo: str, output_path: dsl.Output[dsl.Dataset]):
    from feast import FeatureStore
    import pandas as pd

    store = FeatureStore(repo_path=feature_store_repo)
    entity_df = pd.read_parquet(entity_df_path)
    df = store.get_historical_features(
        entity_df=entity_df,
        features=["driver_hourly_stats:conv_rate", "driver_hourly_stats:acc_rate"],
    ).to_df()
    df.to_parquet(output_path.path)


@dsl.component(base_image="python:3.10-slim", packages_to_install=["feast", "mlflow", "scikit-learn", "pandas"])
def train_and_log(features_path: dsl.Input[dsl.Dataset], mlflow_tracking_uri: str, model_name: str):
    import mlflow, mlflow.sklearn
    import pandas as pd
    from sklearn.linear_model import LogisticRegression
    from sklearn.model_selection import train_test_split
    from sklearn.metrics import roc_auc_score

    mlflow.set_tracking_uri(mlflow_tracking_uri)
    df = pd.read_parquet(features_path.path)
    X = df[["conv_rate", "acc_rate"]]
    y = df["label"]
    X_train, X_test, y_train, y_test = train_test_split(X, y, test_size=0.2)

    with mlflow.start_run():
        model = LogisticRegression()
        model.fit(X_train, y_train)
        auc = roc_auc_score(y_test, model.predict_proba(X_test)[:, 1])
        mlflow.log_metric("auc", auc)
        mlflow.sklearn.log_model(model, artifact_path="model", registered_model_name=model_name)


@dsl.pipeline(name="feast-mlflow-training-pipeline")
def training_pipeline(entity_df_path: str, feature_store_repo: str, mlflow_tracking_uri: str, model_name: str):
    fetch_step = retrieve_features(entity_df_path=entity_df_path, feature_store_repo=feature_store_repo)
    train_and_log(
        features_path=fetch_step.outputs["output_path"],
        mlflow_tracking_uri=mlflow_tracking_uri,
        model_name=model_name,
    )
Each step runs in its own container, making the pipeline portable and reproducible across environments.
Distributed training with the Kubeflow Training Operator
For large-scale models, the Kubeflow Training Operator schedules distributed training jobs. Feast integrates naturally because it provides a consistent Python API for retrieving feature data — whether training is running on a single machine or across a cluster of workers. Each worker calls get_historical_features for its shard of the entity dataframe, and the resulting features are passed directly into the training loop.
Bringing It All Together: Feast → MLflow → Production
The following end-to-end workflow shows how the three tools hand off to one another:
Step 1: Register and materialize features with Feast
feast apply      # Register feature definitions in the registry
feast materialize-incremental $(date -u +"%Y-%m-%dT%H:%M:%S")
Step 2: Run experiments and select the best model with MLflow
Feature engineers iterate on feature definitions in Feast while data scientists run experiments in MLflow, logging which features were used for each run. The best run is registered in the MLflow Model Registry:
mlflow.register_model(f"runs:/{best_run_id}/model", "driver_conversion_model")Step 3: Promote to production
Promoting the model in MLflow signals that it is ready for deployment. At this point, you also know the exact subset of Feast features required by that model — these are the features to materialize and serve.
client = mlflow.tracking.MlflowClient()
client.set_registered_model_alias(
    name="driver_conversion_model", alias="production", version="3"
)
Step 4: Serve features and predictions
The deployed model reads its inputs from the Feast online store at inference time:
from feast import FeatureStore

store = FeatureStore(repo_path=".")

def predict(driver_id: int) -> float:
    features = store.get_online_features(
        features=["driver_hourly_stats:conv_rate", "driver_hourly_stats:acc_rate"],
        entity_rows=[{"driver_id": driver_id}],
    ).to_dict()
    return model.predict_proba([[features["conv_rate"][0], features["acc_rate"][0]]])[0][1]
Summary
| Concern | Tool |
|---|---|
| Feature definition, storage, and serving | Feast |
| Experiment tracking, metric logging, and model versioning | MLflow |
| Workflow orchestration and distributed training | Kubeflow Pipelines + Training Operator |
| Hyperparameter optimization | MLflow + Katib (Kubeflow) |
| Production feature serving | Feast Online Store / Feature Server |
Feast, MLflow, and Kubeflow are each best-in-class at what they do, and they are designed to work alongside one another rather than replace each other. By combining them you get a fully open-source, end-to-end ML platform that handles everything from raw data to live predictions — without lock-in.
If you are new to Feast, check out the Feast documentation and GitHub to get started. Join the community on Slack and let us know how you are using Feast in your ML stack!